Okay. So we spend plenty of days during the year dressing up in things that other people would only wear on Halloween. To us it's perfectly normal and beautiful.
So what do we do to get creative on Halloween? We already dress like pin-ups on a normal Saturday night!
MAC cosmetics has an awesome idea! Let's take our love of mid-century and do it a little different.
BE A LICHTENSTEIN!
The MAC artists have created a very cool video with Halloween makeup ideas. I love this one based on the pop art of Roy Lichtenstein. Time for school boys and girls!
For those of you who took Art History 101, this is just a refresher course. And for those of you who are not yet familiar with his work, I can guarantee you have seen his style copied. Which is ironic because that is exactly what he did, but as a social criticism. We're all just putting a new spin on something we've seen somewhere else and making it our own self-expressionist version.
Mr. Lichtenstein started creating his signature style of pop art in the early 60s. It is based on the look of commercial printing. There is a an obvious dot pattern on printing from the time period. He used this as his critique on commercialism that was booming at the time, much like Warhol used soup cans and Monroe.
And we come back around to MAC using it as a way to promote and sell products. Did I just hear the sound of Lichtenstein rolling over in his grave? ;)
Check out the latest wedding hairstyles in large bridal hair gallery. Find the latest, newest styles that include updos, partial updos and many other options.
Schedule a trial run with your hair stylist several weeks before your wedding and make sure the hairstyle you like looks good with your dress. Make adjustments during your consultation and you will be sure to have the best style for your big day.


 Here is the hair length of the doll I am using. Its layers are a little longer on top, but the ends of the hair are fine.
 I started with the side sections, curling the hair forward. When I want some kind of wave or texture all the way to the root to mimic the pin curls of the day I curl the hair in a different direction than the way I am going to direct later. I also roll the hair all the way to the scalp to curl as much of the shaft as possible.
 I then pin up the side sections in dry pin curls. Use your own judgement on where you would like to place them. As always, use pomade to smooth fly-aways and give the hair shine.
 I still have a section of hair at the front that is about 2 inches wide and 1 1/2 inch deep. I sectioned out a piece of hair that is about 3/4 inch wide and again curl it forward rolling all the way to scalp on-base. Please be sure to use a comb between the iron and your scalp. I should have done it here, but wasn't thinking because my mannequin head doesn't have nerves.
 Comb or brush the hair gently back. Notice this is the opposite direction of which I curled it.
 I then relaxed the hair piece and allowed it to lie down on the hair. Arrange it and move it to get the maximum wave out of it. And pomade will help accentuate the wave with shine.
 The final pieces left, I curled to the right on-base.
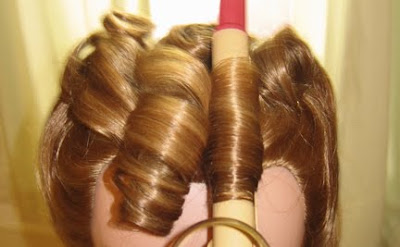 I brushed these together and then teased them a little to help hold the hair together.
 Then smooth the outer hair of the piece and arrange how you like so that the hair created a figure eight above the forehead.
 Next comes the bottom section. The first thing to do is coat the ends in hairspray. This is where the asphyxiation comes in. Any girl who was born before 1980 probably remembers having a hairstyle that involved coating the hair in spray and then curling it with a hot curling iron. When the curling iron starts to sizzle, then you know you are doing it right. You create this crusted, rock hard curl.
 You will need to roll the curling iron all the way up the base of the neck. When you release it, the weight will make it fall some.
 For this mannequin, it took 4 curls to go all the way around the bottom. I would say that is the minimum. With thicker hair you will want to work in smaller sections.


 If her hair were cut a little more diagonal at the front, I could have gotten more slant in the lower section. I also could have turned the curling iron at a little more diagonal, but otherwise, I like the way it turned out.


